$ cd /projects/void-linux-first-run
Void Linux First Run
Building a usable Void Linux system from the base glibc install, including XBPS, runit, logging, time synchronization, essential tools, and basic hardening.
- Void Linux
- XBPS
- runit
- socklog
- chrony
Void Linux may very well end up becoming my daily-driver Linux system.
That’s a bigger change for me than simply trying another distribution. I’ve used Debian extensively, so moving away from it is a much harder decision than deciding I’ve outgrown Ubuntu.
Increasingly, though, both Debian and Ubuntu give me a different starting point from the one I want. I find myself removing things I never wanted, updating a substantial pile of packages before I’ve really begun configuring the system, and accepting systemd whether or not it is the service-management model I would choose for myself. When the beginning of an installation feels more like an eviction than a build, it may be time to reconsider the starting point.
For this first Void installation, I deliberately chose the base glibc image rather than one of the desktop images. I didn’t particularly want XFCE for this test, but more importantly, I wanted to start with Void itself and build upward. If I eventually decide XFCE is exactly what I want, fine. I just don’t want that decision made before I’ve had a chance to make it myself.
Starting with the base image lets me learn how Void actually works and choose the pieces individually rather than spending the first part of an installation undoing somebody else’s choices.
I don’t normally spend much time worrying about the politics of the people who develop the software I use. They don’t have to agree with me, and I don’t have to agree with them. I’d generally rather judge software by what it does.
Some projects, however, make their politics difficult to ignore. When a project or company goes out of its way to make it clear that people with my views aren’t particularly welcome as users, that becomes part of my decision too. I’m not interested in arguing with them about it or demanding a place at their table.
Where I have a reasonable alternative, I’ll take them at their word and use something else.
These are the notes from that first run, cleaned up considerably from the working notes I accumulated along the way.
First Things First: Update the System
On a fresh installation, the first order of business is XBPS, the X Binary Package System used by Void Linux.
I started by bringing XBPS itself and the installed packages up to date:
sudo xbps-install -u xbps
sudo xbps-install -Suy
If the update installs a new kernel, this is a good point to reboot before going farther:
sudo reboot
XBPS took a little adjustment simply because its commands and option names are different from the apt and dnf muscle memory I already had. Once that wore off, it proved straightforward.
Some of the commands I found myself using most often were:
| Task | XBPS command |
|---|---|
| Install a package | xbps-install <package> |
| Remove a package | xbps-remove <package> |
| Search repositories | xbps-query -Rs <keyword> |
| Search installed packages | xbps-query -s <keyword> |
| Show repository package information | xbps-query -R <package> |
| List installed packages | xbps-query -l |
| List files belonging to a package | xbps-query -f <package> |
| Synchronize repository indexes | xbps-install -S |
| Upgrade the system | xbps-install -Syu |
That distinction between xbps-query -Rs and xbps-query -s is particularly useful: the former searches repositories, while the latter searches locally installed packages.
For occasional cleanup:
sudo xbps-remove -Oo
That removes cached package files and orphaned dependencies.
Enabling the Nonfree Repository
Void’s official repository set includes a separate nonfree repository for packages that cannot live in the main repository because of their licensing or distribution terms.
Enabling it is straightforward:
sudo xbps-install void-repo-nonfree
sudo xbps-install -S
I verified the active repositories with:
xbps-query -L

At that point both the standard current repository and current/nonfree were configured and shown as RSA signed on this installation.
Logging: Something I Actually Want on a Server
One of the more surprising things about the base installation was that it did not include a system logger by default.
That may be wonderfully minimal, but I like logs. When something breaks at 2:00 in the morning, “nothing was recorded” is not one of my preferred troubleshooting tools.
Void provides socklog, a syslog implementation from the author of runit. I installed the packaged configuration:
sudo xbps-install socklog-void
Then enabled userspace and kernel logging:
sudo ln -s /etc/sv/socklog-unix /var/service/
sudo ln -s /etc/sv/nanoklogd /var/service/
Logs are stored below:
/var/log/socklog/
svlogtail provides a convenient way to inspect them. For example:
sudo svlogtail secure
To let my regular account read the logs without using sudo every time, I added it to the socklog group:
sudo usermod -aG socklog <username>
This was also my first reminder that Void expects you to make some explicit choices that other distributions often make on your behalf. I don’t consider that a bad thing. It does mean a “base install” really is a base install.
Getting the Clock in Sync
Accurate time matters for logs, scheduled jobs, authentication systems, and generally keeping computers from lying about when something happened.
For this system I chose chrony:
sudo xbps-install chrony
I enabled the daemon through runit:
sudo ln -s /etc/sv/chronyd /var/service/
Then checked synchronization with:
chronyc tracking
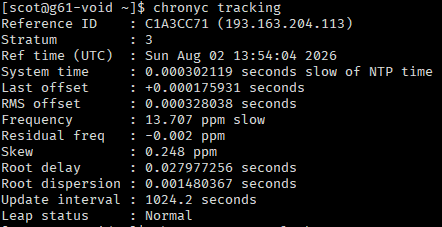
The captured output showed Leap status : Normal and very small clock offsets, which was exactly what I wanted to see.
Installing the Tools I Expect to Find
The base image is deliberately sparse. I added the utilities I normally expect on a working Linux system:
sudo xbps-install htop neovim curl wget git bash-completion unzip tree
The exact list will obviously vary by machine. This was simply my starting set rather than an attempt to define a universal “must install” list.
Runit: Different Enough to Require Unlearning a Habit
Coming from systems where I had spent a lot of time with systemd, runit initially felt a little unintuitive. The underlying model is actually quite small.
Installed service definitions live under:
/etc/sv/
The active runsvdir is available through:
/var/service/
Enabling a packaged service is therefore commonly a matter of linking its service directory into /var/service/:
sudo ln -s /etc/sv/<service> /var/service/
Once I stopped expecting systemctl, the common operations were easy enough to map mentally:
| Task | runit / Void | Familiar systemd equivalent |
|---|---|---|
| Enable packaged service | ln -s /etc/sv/<service> /var/service/ | systemctl enable <service> |
| Disable service | rm /var/service/<service> | systemctl disable <service> |
| Start service | sv start <service> | systemctl start <service> |
| Stop service | sv stop <service> | systemctl stop <service> |
| Restart service | sv restart <service> | systemctl restart <service> |
| Check status | sv status <service> | systemctl status <service> |
| View logs | cat /var/log/socklog/<service>/current | journalctl -u <service> |
| List enabled services | ls /var/service/ | systemctl list-unit-files --state=enabled |
A useful distinction is between disabling a service and merely keeping it down temporarily. Removing the symlink disables it. To keep an enabled service stopped until it is brought back up or the machine reboots:
sudo sv down <service>
and later:
sudo sv up <service>
To see the service definitions available on the system:
ls /etc/sv/
To see the services enabled in the active runsvdir:
ls /var/service/
I wouldn’t call runit difficult. It is simply a different service-management model, and the fastest way for me to learn it was to stop mentally translating every operation into systemd first.
Runit manages services. So far, it has shown no desire to manage my home directory, DNS resolver, boot loader, coffee maker, or personal affairs.
I’m cautiously optimistic.
Basic Hardening
Once the basic operating environment was working, I started applying the usual baseline security measures rather than treating a successful boot as the finish line.
SSH
I prefer SSH keys over password authentication. After confirming key authentication works, I disable password authentication in sshd_config:
PasswordAuthentication no
I also disable direct root login over SSH:
PermitRootLogin no
Administrative work can then be done from a regular account with the appropriate privilege escalation rather than exposing remote root authentication.
Updates
Security updates only help after they are installed. My working notes called for regular XBPS updates, using the normal system-upgrade command:
sudo xbps-install -Syu
How aggressively that should be automated depends on the function of the machine. For a system I care about, I want an update policy I understand rather than unattended changes simply because a cron example fit on one line.
Firewall
The same principle applies to the firewall: expose only the services the machine is supposed to provide. My starting point is SSH only, then add ports deliberately as services are deployed.
Monitoring
For local inspection I installed htop as part of the basic tool set. Longer-term monitoring depends on what role this machine eventually takes on; I don’t need to install an entire observability stack merely to claim that I have one.
Where This First Run Left Me
The interesting part of this exercise wasn’t installing Linux. I’ve done that enough times that getting another kernel to boot is not much of an accomplishment by itself.
The useful part was learning the assumptions Void doesn’t make for me.
I had to spend a little time with XBPS instead of reaching automatically for apt or dnf. I had to understand how runit enables and supervises services rather than translating everything through systemctl. I explicitly chose and enabled logging and time synchronization. None of those tasks was especially difficult, but together they forced me to pay attention to how the system is assembled.
That was the point of starting with the base image in the first place.
The result is now a usable foundation rather than a finished workstation. The next phase is deciding what I actually want from a daily-driver desktop: graphical environment, applications, audio, hardware support, backups, virtualization, development tools, and all the small conveniences that turn an operating system into my operating system.
I may ultimately install XFCE. I may choose something else. Either result is fine.
The point of starting with Void’s base image was that the decision would be mine.
Of course, what began as an operating-system installation has now become another project.
That seems about right.